
A Vim crash course, of sorts...

This post will be a mixture of my own personal VIM cheatsheets, along with a high-level overview of the Vim text-editor. Text-Editors are a dime a dozen, with so many fantastic options to choose from. Some swear by EMACS and Nano, others are devoted to Sublime Text and Visual Studio Code. Some even remain firm in their devotion to the likes of Notepad++ and Atom, but we don't talk about them.
Obligatory introduction aside. let's proceed:
Vim has 3 main modes:
1) Normal mode:
This is the mode that Vim defaults to when opening the editor. All keystrokes within Normal Mode are interpreted as commands.
If your first Vim session was anything like mine, you may have had a traumatic experience with Normal-Mode. Sweat dripping down your forehead as every button you press appearing to delete and corrupt sections of the file. Panickedly trying to kill the process and making swap files all over the place, until you reach out to a pal for help. Doesn't sound familiar? Oh...
2) Insert mode:
In this mode, Vim will take all keystrokes (aside from special modifier keys) as input to be written into the file. This operates similarly to a typical Notepad-like text editor.
How bizarre! Why would a text-editor hide the input function behind a completely different mode? Well, because Vim truly is a text editor! Where other editors focus on creating and populating files, Vim approaches the matter from a very UNIX-ey perspective, by assuming that the file is already populated. You may not want to add to the file, it may be a critical system file, or some extremely complex code. You may be more likely searching through the file, or removing elements from it. For this reason, VIM's separate Insert-Mode makes a lot of sense.
Besides, in all honesty if you are simply looking to write code, there may be more appropriate editors out there for you.
3) Visual mode:
In Visual Mode, sections of the file can be highlighted to define a range for the following operation.
Think of it like dragging your mouse to highlight a file, except you don't need a mouse. And it's faster. And you can select areas not possible with a mouse. Yeah.
Thats Visual-Mode.
Very Basic Introduction to Vim
You may not be here to master Vim. Perhaps you just want a quick overview? Perhaps you have a live file open right now that you have really messed up, and desperately need to exit the damn thing?
Okay. Read this section, then off you go.
1) Opening files
vim <filename>
2) Enter Insert Mode
i
3) Make Changes
Use the arrow keys to move around the file, and keyboard to write stuff. Put the mouse aside, it does nothing here.
4) Exit Insert Mode
<Esc>
5) Exit Vim
:wq or ZZ to save and exit
:q! or ZQ to discard changes and exit
Saved you, bro.
Read on to learn what the hell those things just did...
Command Mode
In Command Mode, most keys have an associated function. This may be for replacing text, deleting text, changing modes, or simple navigation around the file. Most functions can also be preceded with a number, which directs Vim to perform that operation a certain number of times. For example, if 'j' goes down one line, '4j' will go down 4 lines.
Here are some of my most useful commands to learn:
Navigation
h - left
j - down
k - up
l - right

e - Move cursor to the end of the current word
w - Move cursor to the beginning of the next word
gg - Jump to the beginning of the file
G - Jump to the end of the file
3G - Jump to line 3 (replace number with intended line number)
CTRL+g - Show file details and current line position
Deleting Text
Text can be deleted in Command Mode by using the 'd' and 'x' keys. These keystrokes will not do anything by themselves, but will wait for an argument specifying what to delete. Here are examples of how this works:
dw - Delete from cursor to the end of the current word
dd - Delete the current line
2dd - Delete 4 lines (including the current line)
d0 - Delete from the cursor position to the beginning of the line
d$ - Delete from the cursor position to the end of the line

x - Delete character under the cursor
4x - Delete 4 characters, including the one under the cursor
X - Delete the character before the cursor
4X - Delete the 4 characters before the cursor
Modifying Text
c - Change the character from the cursor position up to the position indicated by the next command.
y - Copy the characters from the current cursor position up to the position indicated by the next command.
p - Paste yanked text after the current cursor position.
P - Paste previous deleted or yanked (copied) text before the current cursor position.
r - Replace the current character with the newly typed one.
s - Substitute the text from the current cursor position up to the position given by the next command with the newly typed one.
. - repeat the last insertion or editing command (x,d,p…).
Insert Mode
Entering Insert-Mode
i - Enter Insert Mode at current cursor position.
a - Enter Insert Mode after cursor position.
A - Enter Insert Mode at the end of the current line.
Exiting Insert-Mode
<Esc>
Visual Mode
There are 3 types of Visual Mode: Visual-use, Line and Block:
v - Enter Visual-use Mode. Text will be highlighted from the current cursor position (continue to move around with `hjkl` or the arrow keys).
V - Enter Visual Line Mode. The entire current line will be highlighted, and adjacent lines will be highlighted as you move up and down the file with jk)
CTRL+v - Enter Visual Block Mode. A block of text can be highlighted accross multiple rows and lines.
Highlight range in a Visual Mode and then "c" to "change". Then type and exit to apply to whole area.
Suppose you have selected a rectangle (using Ctrl-v), you can insert text in front of it by typing I (switch to insert mode) and inserting your text. As soon as you leave the insert mode, the text will be added to all the other selected lines. Use A to enter text after the selection.
Vim Command-Mode and Ex-Mode
While Ex is a classic text-editor in it's own right, VI and Vim incorporate and support the use of Ex commands in a special Ex-Mode that can be entered from Command-Mode by using the colon (:) keystroke.
This command-line format of Command-mode is very reminiscent of the original ED text-editor, of which Ex has roots in. Many UNIX commands originate from the foundations set by ED, such as the grep command, which was initially just an ED function to search a file for a matching string and print it:
global/regular expression/print
gl/regex/pr
g/re/p
These commands can be extremely powerful, especially when combined with targeted Regular Expressions. Following are a couple of command examples that I often use in day-to-day file editing:
Delete all lines containing a string:
:g/findthis/d
Alternatively, delete all lines NOT containing said string:
:g!/findthis/d
Replace globally:
:%s/findthis/replacewiththis/
The above operations all operate on a global range, the entire active file, however this can be restricted to specific sections of the file when paired with Visual Mode as follows:
1) Highlight in Visual Mode with v (or with V or CTRL+v, depending on your range).
2) Enter a colon keystroke. You will now be dropped into Ex-Mode, however there will be :'<,'> prepopulated at your prompt. This will restrict the operation range to only the selected lines.
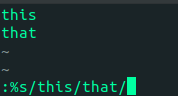
3) You can then perform an operation on the selected range, for example, to replace all instances of "this" with "that":
:'<,'>s/this/that/g
- Hit
<Enter>. You will immediately notice the changes applied to the range. Note that only the instances of "this" within the highlighted area will be altered, and not throughout the rest of the file.
Vim Configuration
The beauty of Vim is that while the default out-of-the-box configuration will do the job, the possibility for customization is literally infinite! The source code is at your fingertips, so go nuts! Nevertheless, there are some truly useful customization options that will enhance your experience. Here are a few of the tweaks I usually add. These can be enabled as one-off changes live in the editor, or added to the .vimrc file in your home directory to be set persistently:
:set number
:colorscheme elflord
:syntax on
:set tabstop=4
I won't bother going through any more, but be sure to check out this really cool .vimrc file here!
Mastering Vim
Okay, yes there is a lot to Vim. It is not easy to learn, but practice makes perfect. A couple of resources that will really speed up this learning process would be:
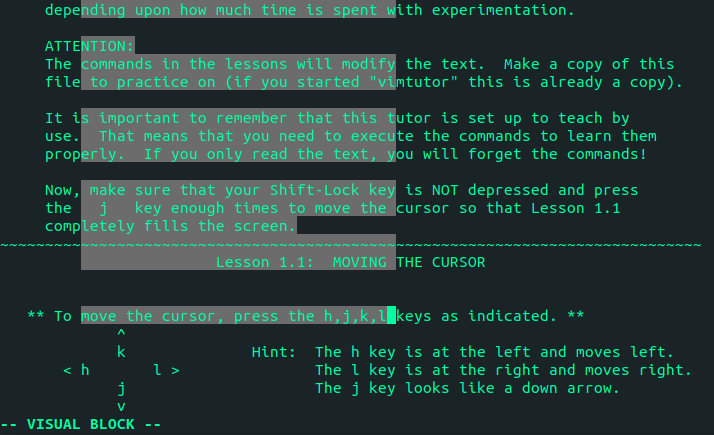
1) VIMTUTOR
An awesome, in-depth masterclass of a file that is actually packaged with Vim! You may not have noticed it before, but try typing in the command vimtutor in your Linux terminal and follow along.
2) Vim Adventures
A polished browser game designed to get your fingers well-versed with the fundamental keystrokes needed for navigating the Vim editor. This game is very good fun, and well worth checking out:
Other than the above...
Practice, practice, practice!
Vim Everything!
Ranger
Complete Linux file-system navigator! Bounce around your directory structure with hjkl or the arrows, and automatically drop into a Vim instance when selecting a file!
SurfingKeys
Vimify your browsing experience with this Chrome/Firefox plugin! Scroll around websites with hjkl, open elements with f, copy URLs and element text with the embedded Visual-Modes, and quickly search for matching strings with /. This plugin has completely removed my requiements for a mouse when browsing, and I would highly recommend to anybody already familiar with standard keyboard shortcuts. Be sure to check out the available features with ?.
Other Editors
Vim is more than just Vim. Vim is so much more. Try enabling Vim-mode in your other favourite editors, such as Sublime Text 3 or Visual Studio Code, and see how well the (eventually) intuitive key-bindings complement the added GUI and Syntax Context features of these editors.
This has been my contribution to the Vim master-race, and if you have made it this far then thank you for reading along!
I hope this has been insightful, helpful or enjoyable at the very least.