
Managing IOS-XR Linux Environment over SSH
So your shiny new Cisco device now comes with some added toys, such as a fully-fledged built-in Linux environment complete with YUM package manager, Docker support and all the possibilities that these open doors for. Obviously Cisco are paving the way for the hosting of micro-services and applications on network infrastructure, and I'm all for it.
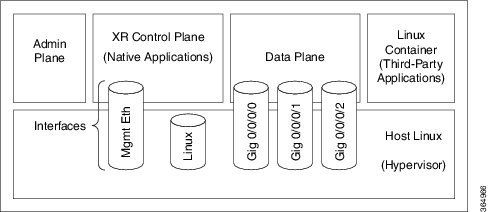
Because the Wind River Linux environment is fully integrated into the hypervisor, this environment has complete power over all configuration management applications, full file-system access and unique networking namespaces that can inherit from (or route independently of) the IOS-XR environment:
If we want to start treating our Linux environment as the potential server it now is, we need a bit of basic configuration. For my use case, I am not yet using IOS-XR for hosting an AAA or DHCP server, nor am I running any production containerized applications. Nevertheless getting direct access to the Linux environments on our ASR9K infrastructure opens the door for tools such as Ansible to manage network devices natively, and can make shell operations such as copying across firmware update tarballs and retrieving show tech-support outputs a breeze.
This post will show how to enable direct access to an IOS-XR Linux environment from a remote-host...
Managing IOS-XR Linux Environment over SSH
From the IOS-XR prompt of your device, you will want to drop into the shell of your Linux environment with the bash command:
RP/0/RSP1/CPU0:spare-9k#
RP/0/RSP1/CPU0:spare-9k#bash
Tue Aug  6 12:34:56.789 BST
[9k:~]$
[9k:~]$
[9k:~]$ whoami
root
Fantastic, we are root!
Now we want to create our own user account. Use the adduser facility to create a new account named Ansible:
[9k:~]$ adduser ansible
Login name for new user []:ansible
User id for ansible [ defaults to next available]:

etc, etc, etc...

Enter new UNIX password:
Retype new UNIX password:
passwd: password updated successfully
Done...
[9k:~]$
To give sudo privileges to our new user we will need to edit the /etc/sudoers file by running sudo visudo and adding our user below the existing entry for root, as per the below:
## User privilege specification
##
root ALL=(ALL) ALL
ansible ALL=(ALL) ALL
Also in the same file we will need to uncomment the below line to allow non-root login:
## Uncomment to allow members of group sudo to execute any command
# %sudo  ALL=(ALL) ALL
Now that we have our non-root user created, we will need to enable SSH in the Linux environment. Start the sshd_operns service:
[9k:~]$
[9k:~]$ service sshd_operns start
SSH service for global-vrf has been created. You may use 'service sshd_operns_global-vrf <start|stop|reload|restart|status>'.
Service can be configured to run on reload using 'chkconfig --add sshd_operns_global-vrf'

etc, etc, etc...

Starting OpenBSD Secure Shell server: sshd
  generating ssh RSA key...
  generating ssh ECDSA key...
  generating ssh DSA key...
  generating ssh ED25519 key...
[9k:~]$
[9k:~]$
Once the service has started, make sure it is running and find out what port has been dedicated for SSH (as the IOS-XR environment will be using TCP/22):
[9k:~]$ service sshd_operns status
sshd (pid  9537) is running...
[9k:~]$ netstat | grep 9537
[9k:~]$
[9k:~]$
[9k:~]$ netstat -nlp | grep 9537
tcp        0      0 0.0.0.0:57722           0.0.0.0:*               LISTEN      9537/sshd
tcp6       0      0 :::57722                :::*                    LISTEN      9537/sshd
Okay, so we can see that port TCP/57722 has been opened for SSH to the Linux environment, and is now listening on all interfaces. The sshd_operns config files can be found with the OpenSSH config files, in /etc/ssh/. Edit the files sshd_config_operns and sshd_config_operns_global-vrf to configure the ports, listening addresses and any further parameters to see fit.
We now have SSH open on our Linux environment. Assuming all went well, we can now hop over to our remote host and test remote-access directly into the Linux environment:
skylar@ansible.skyenet.tech:~$ ssh -p 57722 ansible@spare-9k
ansible@spare-9k's password:
[9k:~]
[9k:~]$ whoami
ansible
[9k:~]$ sudo su
Password:
[9k:~]$ whoami
root
[9k:~]$
And Ansible...
Now that we have direct access, we can onboard into our Ansible domain. Copy our SSH keys over to the host with ssh-copy-id, and the host to our /etc/ansible/hosts file:
...
  hosts:
    ios-xr-linux:
      ansible_port: 57722
      ansible_host: spare-9k
And now we can verify Ansible management with our favorite Playbook:
---
- name: This is a hello-world example
  hosts: spare-9k
  become: yes
  tasks:
    - name: Create a file called '/tmp/testfile.txt' with the content 'hello world'.
      copy:
        content: hello worldn
        dest: /tmp/testfile.txt
[ansible@ansible-host:/etc/ansible/playbooks]# ansible-playbook hello-world.yml

PLAY [This is a hello-world example] *******************************************

TASK [setup] *******************************************************************
ok: [spare-9k]

TASK [Create a file called '/tmp/testfile.txt' with the content 'hello world'.]
changed: [spare-9k]

PLAY RECAP *********************************************************************
spare-9k             : ok=2 changed=1 unreachable=0 failed=0
Success! Our playbook was able to SSH directly into the IOS-XR host Linux environment, elevate to root using the sudo privileges we allowed earlier, create a file with the content as specified in our playbook, and finally close the connection again. While this is by no means any accomplishment in the SysAdmin space, this is the mark of progress towards managing Cisco infrastructure as the Linux hosts they are.
Here we have walked through the early steps of bringing our Cisco infrastructure under the wing of our server management tools. Cisco are making a lot of big changes in the Networking space, and I look forward to seeing where we go next.
Thanks for reading along.